Introduction to slack apps
Slack provides a great avenue to collaborate and like most big platforms offers an automation option.
I’ll be exploring a few facets of slack automation to get you up and running. This walkthrough will be tailored for the absolute beginner. However, some familiarity with the python programming language will be required to follow along.
We’ll be using a python-based slack package (slack_sdk) that will offload a lot of the heavy lifting in dealing with the Slack API directly. Without further ado let’s get started.
Creating a Slack App
Some permissions
You’ll need a personal slack workspace or permission from the admin of one to create a slack app, having acquired this permission, proceed to this link to get started.
Click on create custom app and proceed to fill out the app name and choose the desired workspace. I’ll call mine beginner_bot. Create the app and you’ll be presented with a page where we’ll set some permissions for your app. You’ll need at least one permission (scope) to install your app to the workspace.
Oauth and Permissions (scopes)
Click on the Oauth&Permissions link on the sidebar to your left, scroll down to the Scopes section and to the Bot token scopes section and click on add an oauth scope to add a scope. You’ll add channels:history scope as a starter, you’ll add more scopes later as needed. You can now install your app to the workspace, scroll up and you should see a button for doing that.
Going back to your workspace the app should be visible in the apps section on the sidebar on the bottom left. If you cannot see the app there, just click on the add apps button, search for it and click on it, it should now be visible.
The Slack Bot Token
Before we proceed to write the code we need to grab an authorization token, the token enables the bot to perform basic CRUD functionalities in the workspace. From the slack workspace click on the dropdown from the top right corner from the dropdown hoover over settings and administration and click on the Manage Apps option. You should consequently be redirected to a page with all your apps, click on Build from the top right, scroll down the page you will be redirected to and click on your app. Click on the Oauth&Permissions tab and copy the Bot User OAuth Token for later.
The code
From your local machine create the folder you’ll work from. I’ll name mine slackbot.
mkdir slackbot
Navigate into the folder and create a virtual environment to work in.
cd slackbot
pipenv --python 3.7
I am using pipenv to create my virtual environment but virtualenv would work just as fine.
We’ll then proceed to install the slack_sdk package.
pipenv install slack_sdk
use pip if you used virtualenv earlier
Security check!
Before you begin coding you’ll need to add the token you copied earlier in a .env file. As a security precaution, never add sensitive information such as the token directly to your code. Create a .env file in your root folder and add the following:
# .env
export SLACK_BOT_TOKEN=xoxb-xxxxx-xxxx
Remember to run source .env in order to load the new environment to your virtual environment.
Now we code
Create an app.py file in your root folder, this is where your bot code will reside. Create the file and add below code:
The code creates a slack api client that you’ll use to authorize communication with the Slack API. So let’s start off simple, let’s see whether you can fetch all messages in a slack channel.
Remember the scope you added earlier? Well you get to see it in action, you’ll need however to add one more, channels:read, do not forget adding a new scope means re-installing the app.
Add below code after re-installing the app:
Let’s test it out
First, you’ll need to add your bot to a channel of choice, I’ll use the general channel, navigate to the channel and @yourbot in the message box, and press enter. Slack will ask whether you intend to add the bot to the channel, confirm this.
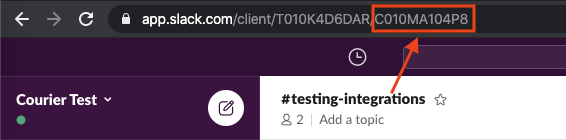
To retrieve the channel_id of a channel, right-click on the channel name on the left bar and click Copy link the last part of the URL link should contain the channel id.
Copy that id and use it in the above function. Proceed to the terminal and execute the file by running python app.py you should see a swath of information on your console. Those are all the messages sent on your general channel accompanied by some metadata concerning the various messages.
Sending a slack message
Now that you’ve observed the ability to read messages let’s try sending one to the same channel, add the code below:
You’ll notice the slack_sdk package proving extremely helpful, we need only concern ourselves with the helper methods provided they abstract a great deal of heartache. Test it out by running the script again.
Oops, we get an error, we are missing a scope (permission), seems we provided our bot with the permissions to read but none to write, let’s do that now.

As the error message points out we need to add the chat:write scope. Don’t forget to reinstall the app after adding the scope. Proceed to run the script again and viola the bot posts our message successfully.

Let’s pen it at that we’ll follow up later on how to make the bot delete existing message(s) as well as other fancy features provided by the slack API.
You can also checkout my article on dockerizing a django app here.
Happy Coding.